Saturday 31 January 2009
Shop Handmade UK - Update
I sold my featured item !!!! Not sure if it was as a direct result of appearing on that website or just through search on Etsy, need to find out and do more of it!
Wednesday 28 January 2009
Rag Doll, my latest completed creation.
.JPG)
.JPG)
.JPG)
.JPG)
.JPG)
.JPG) Just need a name for her now!
Just need a name for her now! She is competely handstitched by me.
I needlefelted her pretty rosy cheeks and added a few beads.
Her hair is needlefelted and her eyelashes stitched with sparkley thread.
I attached a blanket stitch edged heart with a little button.
Next to that is a gingham pinking circle with a fabric flower and button.
Just next to that is a sweet little pocket with a felt baby attached with ribbon.
Finished with one of my new 'pinkliliboo' woven labels.
She is the first one I have made, so any comments appreciated!
Tuesday 27 January 2009
Shop Handmade UK
Ooh................ I'm so thrilled to have an item featured on Shop Handmade UK, a valentine heart, take a look at it here, my Etsy shop where it is available to purchase, if nobody got there before you!!
Wednesday 21 January 2009
Creative Breathing Blog "A Picture Meme"

I have a few blogs that I follow daily and this is one of my favourites, tho I am a bit of a lurker and post comments less often than I would like .........don't know why ......anyhow I was reading this post and just had to have a look at my sixth picture in my sixth folder of 'my pictures' and then spent a good hour browsing the other folders .........made me smile, happy memories.
This is my sixth photo: my lovely Mum in April 2006, in the pool of the villa we rented for our first and, so far, only holiday to Florida. She is age 60 in the photo and I think she looks fantastic, I hope I have her 'age genes'!
We started a savings acount when our first daughter Megan was born in 1994 and then came Elenor in '97 and we kept putting a bit away each month for our Florida fund. We decided 2006 the girls were the right age to appreciate the holiday so it was booked! Can't find the words to describe it, so mush better than we expected, we were told you'll either love it or hate it ...............well we LOVE LOVE LOVED it. Don't know when we will be back but we WILL .......something to dream about!
And here we all are me, Elenor, Richard, Megan, Mum, Dad. Here are my two girls, I love the sunlight sparkling through their hats.


Thursday 15 January 2009
3rd Sale on Etsy!!!

Hip Hip Hurray!!!!!
Made me smile when I dragged myself out of bed this morning having been up in the early hours with an anxiety attack.......'@#*@ things...aghhh!!!!!'
Tuesday 13 January 2009
Tutorial: Handmade Gift Boxes
To make a box which measures 5.3cm x 5.3cm x 2.7cm you will need:
For the base, a square of white card, not too stiff, 14.5 cm square.
For the lid, a pretty piece of quality scrapbook paper 15cm square.
Double sided tape or glue.
Ruler, pencil, eraser, bone folder (optional), scissors.
Embellishments.
 1. Take the square of plain white card.
.JPG) 2. Lightly mark each diagonal with pencil and ruler. This will be the inside of the base of the box.
2. Lightly mark each diagonal with pencil and ruler. This will be the inside of the base of the box.
.JPG) 3. Working on one corner fold the point to the centre of the card (marked by pencil). I use a bone folder to ensure crisp straight edges to the box.
3. Working on one corner fold the point to the centre of the card (marked by pencil). I use a bone folder to ensure crisp straight edges to the box.
.JPG) 5. Open this fold out and then fold the point to the fold you just made.
5. Open this fold out and then fold the point to the fold you just made.
.JPG) 6. Fold this over
6. Fold this over .JPG) 7. and over once more, so the edge lines up with the centre line. Then unfold completely.
7. and over once more, so the edge lines up with the centre line. Then unfold completely..JPG) 8. Repeat with the other three corners and you should have something like the photo above, with and unfolded square in the centre which is the inside of the base of the box.
8. Repeat with the other three corners and you should have something like the photo above, with and unfolded square in the centre which is the inside of the base of the box..JPG) 9. Now we need to cut so we can fold the box into shape. Cut four slits as shown in the above photo. I find it easier to mark four dots so I remember to stop cutting!
9. Now we need to cut so we can fold the box into shape. Cut four slits as shown in the above photo. I find it easier to mark four dots so I remember to stop cutting!
.JPG) 10. Rub out the pencil markings from what is the inside base of the box, the rest won't be seen when folded.
10. Rub out the pencil markings from what is the inside base of the box, the rest won't be seen when folded..JPG) 11. Now we fold the wider sections, point over first
11. Now we fold the wider sections, point over first
.JPG) 12. over again
12. over again
.JPG) 13. and the outer edges inwards, both sides of the box.
13. and the outer edges inwards, both sides of the box.
.JPG) 14. Your box should look like this photo above now.
14. Your box should look like this photo above now..JPG) 15. Push the folded edge upwards to form sides, and stick the little triangle bits down if it helps. Then fold the points of the remaining 'sides' in once each. Attach a piece of double sided tape along the edge ( glue can be used but you will need to hold or clip the box until it has dried).
15. Push the folded edge upwards to form sides, and stick the little triangle bits down if it helps. Then fold the points of the remaining 'sides' in once each. Attach a piece of double sided tape along the edge ( glue can be used but you will need to hold or clip the box until it has dried).
.JPG) 16. Fold the taped edge in, over the 'sides' of the box ,and squeeze to attach the tape firmly. Your base should be like this above.
16. Fold the taped edge in, over the 'sides' of the box ,and squeeze to attach the tape firmly. Your base should be like this above. .JPG) 17. Now repeat the above instructions with the paper to make the top of your box.
17. Now repeat the above instructions with the paper to make the top of your box..JPG)
.JPG) 18. Don't forget to rub out the pencil lines (I did), if you do you could cut a small square to line the lid.
18. Don't forget to rub out the pencil lines (I did), if you do you could cut a small square to line the lid.
.JPG) 19. Hopefully your box will be something like this!
19. Hopefully your box will be something like this!.JPG) 20. The lid fits quite snuggley, if you need it a bit looser increase the size of the paper square used by one or two mm only.
20. The lid fits quite snuggley, if you need it a bit looser increase the size of the paper square used by one or two mm only.
.JPG) 21. I have added some liquid pearl dots and a tag. Fill with tissue paper or shredded cello,
21. I have added some liquid pearl dots and a tag. Fill with tissue paper or shredded cello,
.JPG) Hope this was successful for you if you decided to try it, any comments appreciated!
Hope this was successful for you if you decided to try it, any comments appreciated!
For the base, a square of white card, not too stiff, 14.5 cm square.
For the lid, a pretty piece of quality scrapbook paper 15cm square.
Double sided tape or glue.
Ruler, pencil, eraser, bone folder (optional), scissors.
Embellishments.
 1. Take the square of plain white card.
.JPG) 2. Lightly mark each diagonal with pencil and ruler. This will be the inside of the base of the box.
2. Lightly mark each diagonal with pencil and ruler. This will be the inside of the base of the box..JPG) 3. Working on one corner fold the point to the centre of the card (marked by pencil). I use a bone folder to ensure crisp straight edges to the box.
3. Working on one corner fold the point to the centre of the card (marked by pencil). I use a bone folder to ensure crisp straight edges to the box..JPG) 5. Open this fold out and then fold the point to the fold you just made.
5. Open this fold out and then fold the point to the fold you just made..JPG) 6. Fold this over
6. Fold this over .JPG) 7. and over once more, so the edge lines up with the centre line. Then unfold completely.
7. and over once more, so the edge lines up with the centre line. Then unfold completely..JPG) 8. Repeat with the other three corners and you should have something like the photo above, with and unfolded square in the centre which is the inside of the base of the box.
8. Repeat with the other three corners and you should have something like the photo above, with and unfolded square in the centre which is the inside of the base of the box..JPG) 9. Now we need to cut so we can fold the box into shape. Cut four slits as shown in the above photo. I find it easier to mark four dots so I remember to stop cutting!
9. Now we need to cut so we can fold the box into shape. Cut four slits as shown in the above photo. I find it easier to mark four dots so I remember to stop cutting!.JPG) 10. Rub out the pencil markings from what is the inside base of the box, the rest won't be seen when folded.
10. Rub out the pencil markings from what is the inside base of the box, the rest won't be seen when folded..JPG) 11. Now we fold the wider sections, point over first
11. Now we fold the wider sections, point over first.JPG) 12. over again
12. over again.JPG) 13. and the outer edges inwards, both sides of the box.
13. and the outer edges inwards, both sides of the box..JPG) 14. Your box should look like this photo above now.
14. Your box should look like this photo above now..JPG) 15. Push the folded edge upwards to form sides, and stick the little triangle bits down if it helps. Then fold the points of the remaining 'sides' in once each. Attach a piece of double sided tape along the edge ( glue can be used but you will need to hold or clip the box until it has dried).
15. Push the folded edge upwards to form sides, and stick the little triangle bits down if it helps. Then fold the points of the remaining 'sides' in once each. Attach a piece of double sided tape along the edge ( glue can be used but you will need to hold or clip the box until it has dried). .JPG) 16. Fold the taped edge in, over the 'sides' of the box ,and squeeze to attach the tape firmly. Your base should be like this above.
16. Fold the taped edge in, over the 'sides' of the box ,and squeeze to attach the tape firmly. Your base should be like this above. .JPG) 17. Now repeat the above instructions with the paper to make the top of your box.
17. Now repeat the above instructions with the paper to make the top of your box..JPG)
.JPG) 18. Don't forget to rub out the pencil lines (I did), if you do you could cut a small square to line the lid.
18. Don't forget to rub out the pencil lines (I did), if you do you could cut a small square to line the lid..JPG) 19. Hopefully your box will be something like this!
19. Hopefully your box will be something like this!.JPG) 20. The lid fits quite snuggley, if you need it a bit looser increase the size of the paper square used by one or two mm only.
20. The lid fits quite snuggley, if you need it a bit looser increase the size of the paper square used by one or two mm only..JPG) 21. I have added some liquid pearl dots and a tag. Fill with tissue paper or shredded cello,
21. I have added some liquid pearl dots and a tag. Fill with tissue paper or shredded cello,.JPG) Hope this was successful for you if you decided to try it, any comments appreciated!
Hope this was successful for you if you decided to try it, any comments appreciated! Handmade Gift Boxes
 I sort of got addicted to paper folding and made all of these gorgeous gift boxes, which I later sold on eBay to a lady who made jewellery.
I made the base of each box with white card and the tops of each box with pretty scrapbook papers which I then embellished.
I have never done a tutorial before but I am having a go with these boxes and hopfully there will be a link somewhere on this blog soon!
.JPG)
.JPG)
Saturday 10 January 2009
Relieved this week is over......
now I want to get on with 2009.
No resolutions (!) just:
be happy (keep smiling, keep smiling!)
don't stress ..............grrrr......
book a holiday in the sunshine ........................ booked!!!
lose that last stone.........I will.................back to ww after christmas break....2.5lbs on not too bad!
concentrate on Etsy sales .....................sorted items to list / sale today
walk more with Tilly (dog)...................started well!
Saturday 3 January 2009
Christmas Eve and Day 2008
I think I had got to Christmas Eve.......was strange for Richard as he normally meets up with his brother Mark for a few drinks Christmas Eve afternoon. This year, however, Mark is in Melbourne Australia with his Australian girlfriend Amber. Richard still managed to drag himself out though (!!) and toasted absent friends with brother in law Barrie and some of Mark's friends.
While he was out I had a fabulous 'hairstyle makeover' from my daughters:
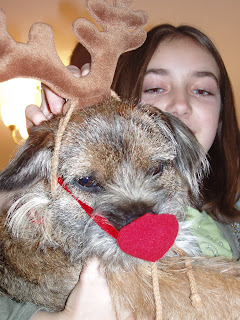
.JPG) Then it was the dog's turn (Tilly the Red Nosed Rudolph) with Bear Factory Accessories, the bunnies didn't get a look in! :
Then it was the dog's turn (Tilly the Red Nosed Rudolph) with Bear Factory Accessories, the bunnies didn't get a look in! :
 Christmas Day arrived (of course he came!) and they got just what they had wished for ( tho' we were determined not to add to the household 'computer' collection..........ah well.
red.JPG) Grandma came to visit in the morning:
Grandma came to visit in the morning:red.JPG)
Then down to my Mum and Dad's for a delicious Christmas Dinner with my sister and my nephew and niece: Jack 7, Bethany 11, and my daughters: Megan 14, Elenor 11.
.JPG) Here's Megan and her Dad (what's with the face Richard?)
Here's Megan and her Dad (what's with the face Richard?).JPG)
My Mum and Dad:
.JPG)
Bethany, sis Jane, Jack:
.JPG) Me and my girls stuffed from a beautiful Christmas Dinner:
Me and my girls stuffed from a beautiful Christmas Dinner:red.JPG)
A parcel had arrived earlier in the week with 15 small individually wrapped gifts from Mark and Amber and on Chrismas morning Richard tentatively opened his........Bearing in mind there is never a serious conversation between Richard and his brother and this is what he received....

Mmmm......... Saturday after Christmas we invited Richard's Mum and Keith and his sisters & families over for food and games and these had us howling with laughter.
Sunday we had tickets to see Barnsley v Preston with 3 course meal before, courtesy of Richard's employers.
Subscribe to:
Posts (Atom)